
When we purchased our house, the small room at the top of the stairs had this open window space that looked down on the living room below.
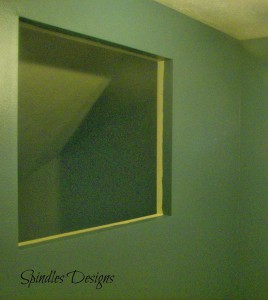 |
| What you see through this space is the ceiling of the living room below. |
There was never much concern about this opening until one day the cat jumped up and nearly fell through. When the grandchildren came along and started wanting to look down, we decided that something needed to be done. What? We talked to an architect friend and found that there was really no purpose for this opening except to break up the boring wall from below. So when the room got painted and became the sewing room we came up with the idea to make it a decorative window. Etched glass.
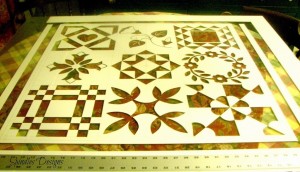
We thought because quilting is a big part of my life and our history it should be a quilt pattern. I designed the pattern to be etched and John designed the frame work and how to install it.
Etching glass is really very easy, all you need is;
Armour Etch (etching cream)
White contact paper
Ruler or straight edge
X Acto knife
Carbon paper
Pattern
Glass cut to size
Sharpe Marker
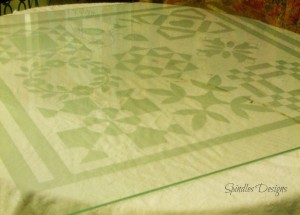
We had someone from the local glass store come measure and cut the correct size glass for the space. The first thing to do wash and dry the glass. Cover completely with white contact paper. Make sure there are no bubbles or folds to prevent leakage. Trace pattern on using carbon paper. When making your pattern remember to think dark and light like a stencil. When pattern is traced onto contact paper mark the spaces that are to be cut. Using the X acto knife carefully start cutting.

When each piece that is to be remove has been cut all the way around use the point of the knife to lift a corner or edge and peel off the cup contact paper and make sure that any loose edges are pressed down for a clear etched line.
Continue this process until pattern is complete. Etch your glass following the directions on the bottle of your etching cream.
Rinse off etching cream. This project was large enough that to rinse off the etching cream we had to take it outside on the picnic table and use a sponge and the hose.
Dry the glass and remove contact paper.
Wash window with window cleaner and you’re ready to install. John made the frame from different moldings glued together, one for each side since it can be view from within the room itself and from the living room below.
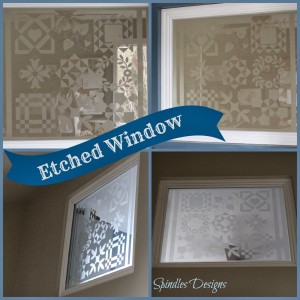
We love how it turned out and get lots of complements. As a bonus in the evening when the sun set it casts a great shadow on the wall below.
Mary Ellen
 |
| Pecan Fudge Brownies |
 |
| Ladybug Doorstop |
So pretty! I would have never thought of it but I absolutely love it!
Thank you. It gets lots of comments. Come back and see us soon.
Thank you for the awesome tutorial. I’ve always wanted to etch a window pane but was too chicken to try it – thanks for the inspiration! Glad I found you over at the Whimsy Wednesday Party!
Marie@The Interior Frugalista
I hope you are able to drum up the courage and a project. It really is as easy as it looks and fun as well. Come back and see us.